

Home Decorating, Create, Family, Gardening, Repurpose and DIY
Showing posts with label RUSTIC. Show all posts
Showing posts with label RUSTIC. Show all posts
April 11, 2016

November 29, 2015
New Construction Update no. 6 Kitchen granite and sink installed
Hope everyone had a wonderful and fulfilling Thanksgiving. The kitchen granite and sink is now installed.


I remember how upset I was when they didn't have the original piece of granite I picked out at the beginning of construction. I was forced to choose from 3 - 4 slabs of colors that were different from our original pick.
It actually turned out pretty nice.

The new color is slightly darker which makes a nice contrast with the white walls and cabinets. It also matches nicely with the stained woodwork.

The faucet I chose was different than the normal single hole faucet that usually gets installed with granite. I like having the two levers for the hot and cold. At least this way I have the option of installing a single lever faucet later if I changed my mind. The holes now are there now for either design faucet that I choose.
The sun and window glass is causing the colors in the picture.

So here is new kitchen completed. The cabinets were designed up to ceiling to keep from having to dust the tops because I'm lazy smart and looking to SIMPLIFY my life. We picked black appliances instead of stainless because I think black is going to be the way to go. The black appliances always look nice. I have black appliances in the my other kitchen.

This is open concept into the living room ( I call it a parlor ) . The floors are still covered and protected as there are still more contractors coming and going doing some finish work.

This is part of the living room from standing in middle of kitchen. It is much larger than the picture shows.

This is still my favorite room of the whole new construction project. I love the ship lap original wall and old window.
I will show you the window and how I distressed it out with just a little sanding and scraping of the multi layers of paint.
October 27, 2015
New Construction Update no. 5 Kitchen Granite and Hardwood Floors
The new construction project is near the end. I'm going to jump ahead here on the project since I lost a camera on vacation with pictures from the project on it.
The kitchen cabinets are now installed.

I picked out Martha Stewart Cabinet knobs and drawer pulls. All the appliances are going to be black. They're actually on the porch and going to be installed next.


At the beginning of the project, we picked out the granite for the kitchen. I had 7 samples to pick from.
When we were with the architect and going over the design, we already knew in the beginning what we wanted for colors and cabinets and stuck to the plan which made it easier. Once you change one thing, everything else changes and it could become overwhelming. If you are planning doing construction, know what you want before you start and try to stick to the plan. You don't want to stress out the contractor and make a million changes. It will slow down the job and the changes will effect other contractors on the job.

The granite we chose was now not available since we first picked it out months ago at the beginning of construction. This is the picture the granite store sent me with a piece similar to the piece we wanted.
I was not happy. I was also not going to select a piece of granite for the new kitchen through a picture in an email.
Our contractor called the granite store and set it up for me to go up and select a piece I wanted. I could drive 45 minutes west to go see the piece that was similar to what we picked or drive 30 minutes east and pick from 3 other pieces.
I dropped our son at school and headed up to see three pieces of granite.


The kitchen cabinets are now installed.

I picked out Martha Stewart Cabinet knobs and drawer pulls. All the appliances are going to be black. They're actually on the porch and going to be installed next.

Here are the choices we had for cabinet door styles. We chose the bead board doors with blank drawers since we already knew we were going to use the the " half moon " drawer pulls. My mom wanted all real wood cabinets which made a difference in some of the pricing. The corner lazy susan unit added in was $1800.

The plumber came and installed all the baseboard heat and tied everything in from the last time he came when he laid out all the plumbing.
Since we were adding a new zone to our heat , we decided to buy a new boiler/ heating system. We didn't replace what we had for a boiler, we bought a new system that mounts to the wall and it's high efficiency and qualifies for the tax credits.
We now have a 4 zone system.
The hardwood floors are installed here in Dark Walnut with 2 coats of poly. The floors will get one more finish coat of poly once the appliances are in and the plumber leaves.
We placed cardboard on all the floors to " plumber " proof them while he installed the heating.

When we were with the architect and going over the design, we already knew in the beginning what we wanted for colors and cabinets and stuck to the plan which made it easier. Once you change one thing, everything else changes and it could become overwhelming. If you are planning doing construction, know what you want before you start and try to stick to the plan. You don't want to stress out the contractor and make a million changes. It will slow down the job and the changes will effect other contractors on the job.

The granite we chose was now not available since we first picked it out months ago at the beginning of construction. This is the picture the granite store sent me with a piece similar to the piece we wanted.
I was not happy. I was also not going to select a piece of granite for the new kitchen through a picture in an email.
Our contractor called the granite store and set it up for me to go up and select a piece I wanted. I could drive 45 minutes west to go see the piece that was similar to what we picked or drive 30 minutes east and pick from 3 other pieces.
I dropped our son at school and headed up to see three pieces of granite.

I got to pick from 3 pieces to stay within the budget of the project.

It was easy to choose the piece since I had to picture the white cabinets and dark walnut floors and black appliances against the slabs.

This piece was the prettiest. It had black , browns , hints of white , beige , gray and specks of maroon. I've seen a lot of granite when I was shopping for ideas and knew I didn't want the granite with the hints of purple in it. The granite with the specks of purple seemed like it was most popular and too common. I've also seen it in a lot of new construction while doing real estate. The trend is now light counters with white cabinets in this area of new $800,000 homes.

I insisted on keeping this wall with the ship lap boards. One of our contractors who is very meticulous was not happy with my choice. He wanted to go over it with new ship lap boards and I kept saying no. I wanted to keep the old window also. I was heartbroken when they cut into the wall. They had to set a beam for the roof and it destroyed the wall. I watched this wall throughout the whole project and a new guy they hired pieced the boards that were cut out and nailed them back in. I flipped out when I came home and saw this mess. The new guy could of put the boards back in the same spot like a puzzle that they were cut from. He didn't.
We headed to the lumber store and I bought some ship lap boards and ripped that whole side of the wall out that weekend. I talked to myself and cursed him for every board I ripped out.

The new ship lap boards are not exactly the same as the old original ship lap. Keep that in mind if you are repairing or replacing ship lap.
This is how it came out. I also sanded and distressed the frame of the old window. I now have a nice base for shabby chic farmhouse decorating for this room.
The reason we kept this window is for natural light into my dining room on the other side. I wanted to keep the house original even though we were tying in a 1,000 sq, ft. of new construction.
When the plumber finishes up, I will show you how nice the hard wood floors came out.
July 10, 2015
Mix n Chic Style Challenge-Decorate bringing the outdoors in
TGIF . Yesterday flew by. Have you ever been stuck on decorating ideas and not knowing where to start? I'd like to share some tips with you that I use . Pick one or two items and let your imagination go wild . There are no rules when it comes to decorating . I'll show you how I chose to bring the outdoors in for this design Mix n Chic Style Challenge . I headed over to Chairish, an online marketplace for vintage and used furniture. They have a great selection of Shabby Chic pieces to add to your home. When the paint is peeling and the metal is rusty, the easier it is to mix it in with any decorating style.

June 8, 2015
Hall Tree Bench Made from Pallet Wood
I finally finished making the entry way hall tree bench this past week. I have been wanting to make one for a very long time now. It's been so hectic around here with the construction going on for the new addition. We are trying to move furniture from 2 rooms as the new addition gets tied into our home with beams, a door and window. There is just no more room to put anything during this time. I did manage to complete some DIY projects that you can make too.


April 22, 2015
Wood Log Mounted Deer Antlers idea
While our tree guy Dan was trimming some trees for us to prep for the new addition construction site, I had him cut some slices off the logs for me approx. 3 inches thick so I could mount the deer antlers I bought last year.


Here's Dan our tree guy on a smaller tree we had to remove. I planted 8-9 trees last year around our property to make up for the two we had to remove.

I've been letting the log slices dry out for 3-4 months now. They will split during the drying process if left untreated. I used a stain mixed with polyurathane and applied several coats.

The log slice doesn't look like it's been treated because it just absorbs the stain/poly like a sponge as it dries out. There is a product you can buy for this process, but it's expensive and I'm only doing this one slice. The other 2 slices did split as they were drying out.
Traced the skull of the antlers onto the wood and remove the inside of the wood so the antlers sit flush.

Cut pieces of rope and cover the skull. You can use a glue gun to attach the pieces.

I originally hung this without mounting it to the wood but it didn't look finished.

I drilled the top of the skull at an angle and used a 3.5 inch wood screw to attach it to the wood.
I used two 2 inch screws for the bottom.

Drill a hole in the back of wood slice and hang on the wall. Since it's such a heavy piece, I decided to hang it on the pine wall in parlor (livingroom) instead of drywall in the den.

It's alot easier to do. A great place to hang my Stetson.

I've been letting the log slices dry out for 3-4 months now. They will split during the drying process if left untreated. I used a stain mixed with polyurathane and applied several coats.
Traced the skull of the antlers onto the wood and remove the inside of the wood so the antlers sit flush.
Cut pieces of rope and cover the skull. You can use a glue gun to attach the pieces.
I used two 2 inch screws for the bottom.
Drill a hole in the back of wood slice and hang on the wall. Since it's such a heavy piece, I decided to hang it on the pine wall in parlor (livingroom) instead of drywall in the den.
It's alot easier to do. A great place to hang my Stetson.
April 2, 2015
1,000 sq.ft. Home Addition Construction Project
Here is an update on the 1,000 sq. ft. addition being added to our home. It will feature a den, another kitchen with open concept into a parlor (livingroom), bedroom, a spa bathroom and area for laundry all on one level. A small porch will also be added to the front and rear entry.I will be showing you this project step-by-step as it moves along.

December 20, 2014
Backyard Playhouse Shed made with Recycled Wood
I thought I'd give you a sneak peak at what I was working on this past summer for our 5 yr old son. I started to build an 8 x 10 shed playhouse for him from recycled wood. It is still under construction and I plan on finishing it up in the spring. He has alot of those pricey ride-on toys that we didn't want to leave out in the weather. I didn't want to take up space in our sheds for our mowers and yard tools with all his toys. I built this strictly for him and his toys.

September 7, 2014
Antique Wrought Iron Arbor with a DIY Pallet Fence
It's back to school this week for our son which means it's back to blogging for me. I hope everyone had a great fun filled summer. I took some time off from posting on my blog this summer to spend quality time with our son. I still managed to complete a bunch of projects. I received an antique wrought iron arbor for Christmas 2 years ago.

May 23, 2014
Window Box Plant Stands - DIY
I was picking through the shed and came across two plastic window planter boxes. I probably got them at the end of last summer because I didn't use them anywhere.
Last Spring, the neighbor out in front of us cut down a few 50' pine trees. The trees shaded the front of our house nicely. I miss those trees. They kept our second floor relatively cool during the summer. They blocked the late afternoon sun which now means all that sun beats through all our skylights and windows. It gets very HOT now.
I've been thinking of way to block some of that sun and add some privacy. I'm going to start with the window boxes and make plant stands. Grow some vines and put them up on the balcony to the master bedroom.
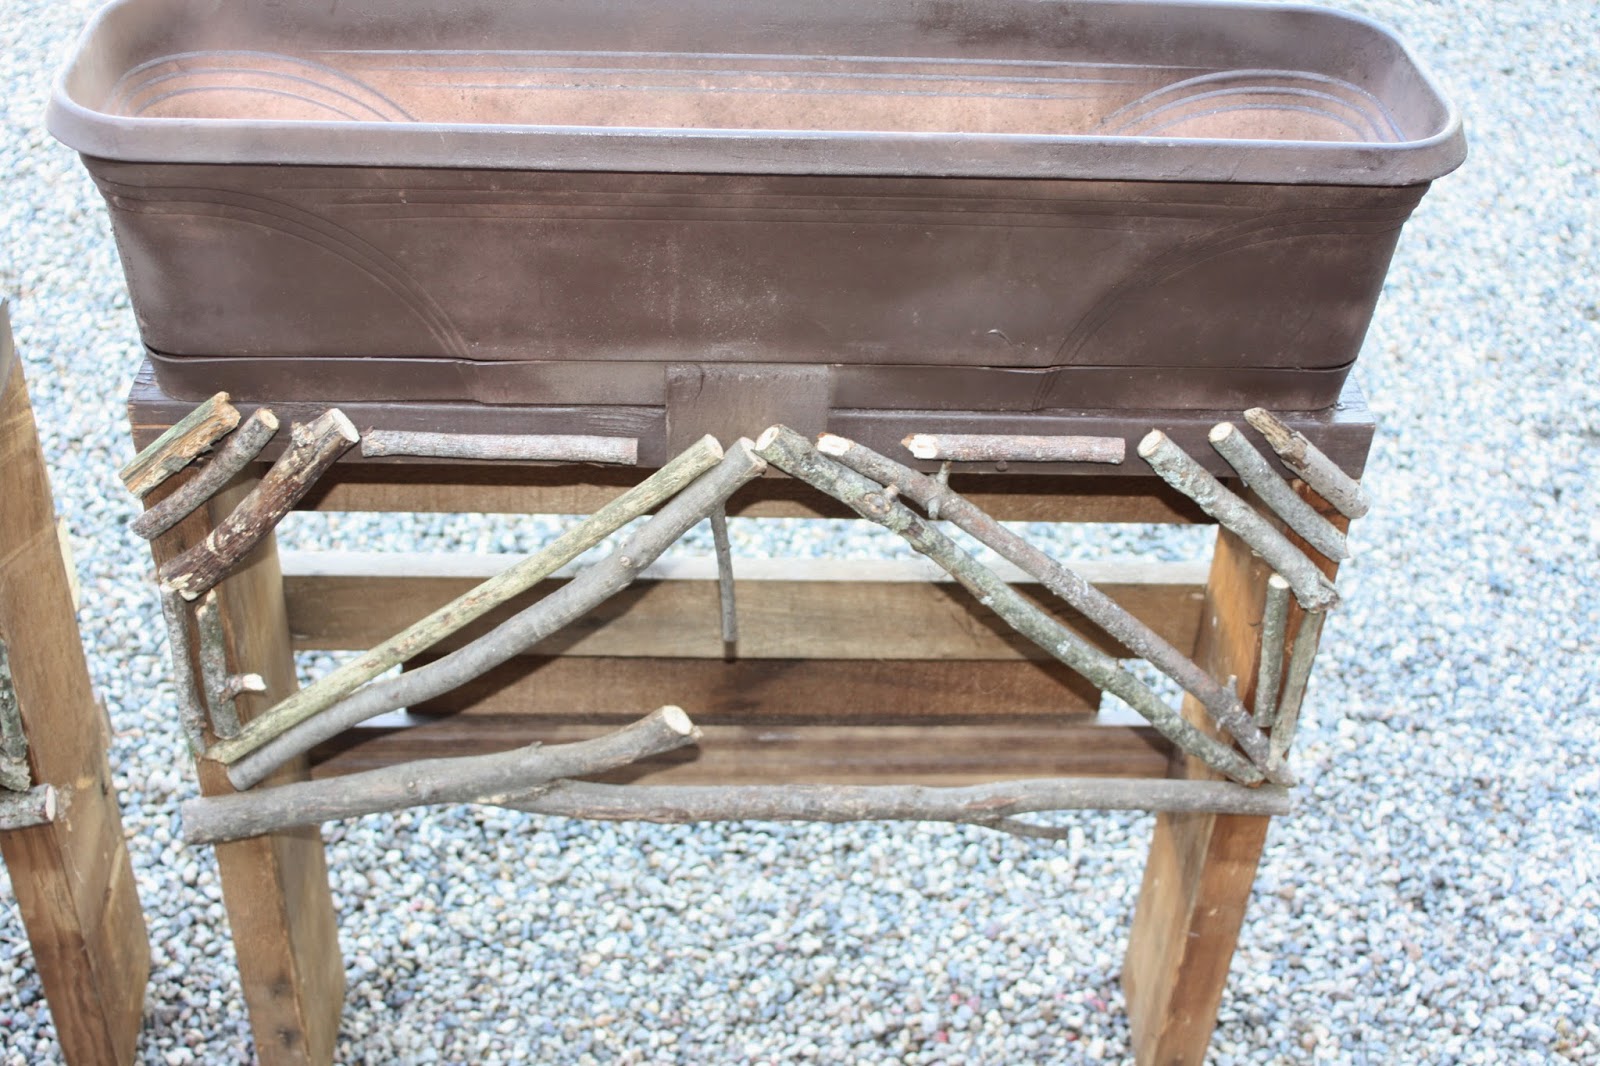
Last Spring, the neighbor out in front of us cut down a few 50' pine trees. The trees shaded the front of our house nicely. I miss those trees. They kept our second floor relatively cool during the summer. They blocked the late afternoon sun which now means all that sun beats through all our skylights and windows. It gets very HOT now.
I've been thinking of way to block some of that sun and add some privacy. I'm going to start with the window boxes and make plant stands. Grow some vines and put them up on the balcony to the master bedroom.
May 2, 2014
Rain delays Painting House
Hello I thought I would have some things all wrapped up this week , but the heavy rain has delayed all my big outdoor projects. I am also putting together some other accents for our yard.
Here's a sneak peak at what I've been working on. The front door is finished with the new colors we chose. These colors so much better than the white against the cedar siding , it brings out the grain in the wood.

Here's a sneak peak at what I've been working on. The front door is finished with the new colors we chose. These colors so much better than the white against the cedar siding , it brings out the grain in the wood.
March 12, 2014
Old Picture Frame and Chicken Wire Art
Ever wonder what to do with old picture frames that have no glass? Try adding some chicken wire to the back of the frame to hang pictures or accent another piece of art. The projects are endless and you also get to recycle the old frame instead of tossing it.


March 4, 2014
Vintage Bed Spring Toilet Tissue Holder
Awhile back I received a significant amount of old mattress bed springs. I have three different sizes and styles. I have come up with a few ideas on what to do with them, but I mainly have them to sell on my Etsy shop. I think they will sell better if I take different pictures on how to incorporate them into decorating.
Here's is one idea I thought was different.

Here's is one idea I thought was different.
February 16, 2014
Rustic and Rusty Hearts
Hello . While it was snowing heavily the other day , I was dreading to have to go outside to snow blow , shovel , and roof rake again, I decided to sit and watch the snow from the window. I made a strong cup of coffee and sat at the table to make some hearts. I added an old chippy painted window to the wall and it needed some accents.

December 22, 2013
Rusty Antique Garden Urns and Fountain
Last week while we were at our favorite garden center shopping for our Christmas tree , I fell in love with this old planter that was out by the front gate. It turned out to be a 2 hour trip because I just kept finding one piece after another and visioned it in our garden.


Let me show you some pieces that I was drooling over for my garden.
December 19, 2013
Holiday Gifts for the Teachers
Hello Everyone. Today is the start of Christmas vacation for our son. They had a small Christmas party at the school with a Santa , snacks and small gifts. As a way to say ' Thank you ' to the teachers , I made them a gift. Although you can never say thank you enough to the teachers for all the hard work they do, a small gift as a sign of appreciation during the Holidays is always nice.


December 13, 2013
Wrought Iron Gates for our home - my early Christmas present
Those who know me , know of my LOVE for anything old and iron. Every year we go to this high end garden center for our Christmas tree that also sells expensive antiques , statues and fountains and so on . They sell the type of antiques for people with homes that are Mansions with gardens that are listed as Estates for the wealthy people. I can only dream when I go in there. While we were walking through the garden center , I saw this beautiful wrought iron arbor with some rust showing throughout it. I fell in love with it. I looked at it over and over and then I saw the price. I said to my honey, " I would love this for our garden. . . oh, maybe someday ." Christmas morning came and he said your present is out in the yard. There it was flat on the ground. I could not believe my eyes. It took three of us to move it and set it up. We set it up over the summer and added a lace vine to each side. The vine has tiny white flowers and grows rapidly. It is so gorgeous.


December 3, 2013
Chalk Painted dresser with a stencil
Last year I got this dresser from a woman who was down sizing. It's old and definitely shows it's age. The top was peeling and part of the hardware is missing. I thought this would be a great piece to try chalk paint. I let it sit for awhile out in the garage. That's where my projects await me.

I was looking thru some blogs that I follow and got my inspiration from Red Hen Home (www.redhenhome.blogspot.com).

I was looking thru some blogs that I follow and got my inspiration from Red Hen Home (www.redhenhome.blogspot.com).

November 24, 2013
Holiday Solar Lanterns - DIY
I have these lanterns outside for the summer with candles in them for tabletop lighting on the deck. I was going to put them away for the winter but decided to try to use them for the holidays instead.

As you can see the lanterns are old and rusty which I love, not to mention all dented. I went by the dollar tree store and picked up 2 holiday solar lights. I then masked and painted the lanterns with black spray paint.

I took the solar lights apart to use the tops of them only for this. I tried to goop the light inside the lantern , but it didn't hold. There is probably too much candle wax on the bottoms in the lantern. I had to think of something else to hold the lights in place. Yup, I borrowed some of my son's good ol' play-doh and I he had some black on hand. I made a couple of play-doh balls and stuck the light into it inside the lantern. I molded the edges over the sides. I tested the lights to see if they would light up outside at night and they did.


Once the play-doh dried and hardened , I added some pinecones cut in half around the base of the lights. I also added some holiday greenery at the tops of the lantern. When the spring comes , I will easily be able to take the holiday lights out and re-use the lanterns again for the spring. I think I can get another year out of them.


I just need to hang them outside.

As you can see the lanterns are old and rusty which I love, not to mention all dented. I went by the dollar tree store and picked up 2 holiday solar lights. I then masked and painted the lanterns with black spray paint.


Subscribe to:
Posts
(
Atom
)
pin it

